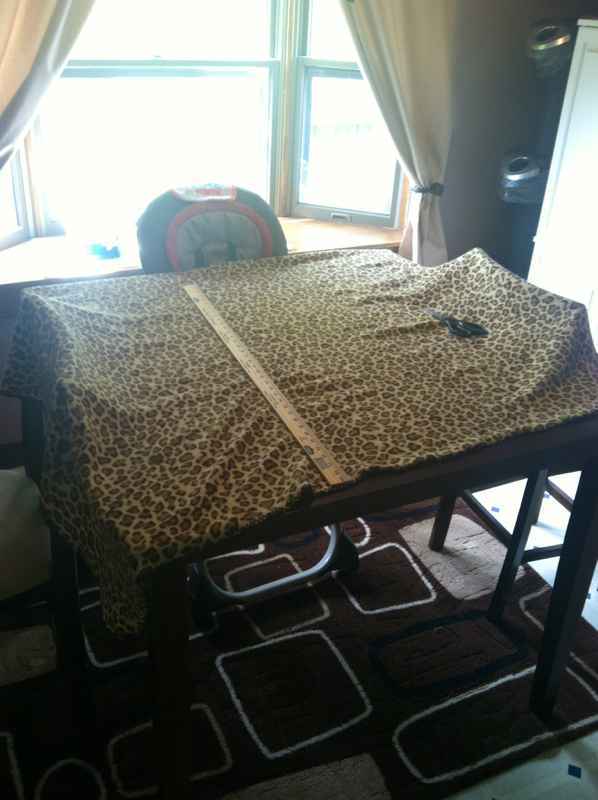
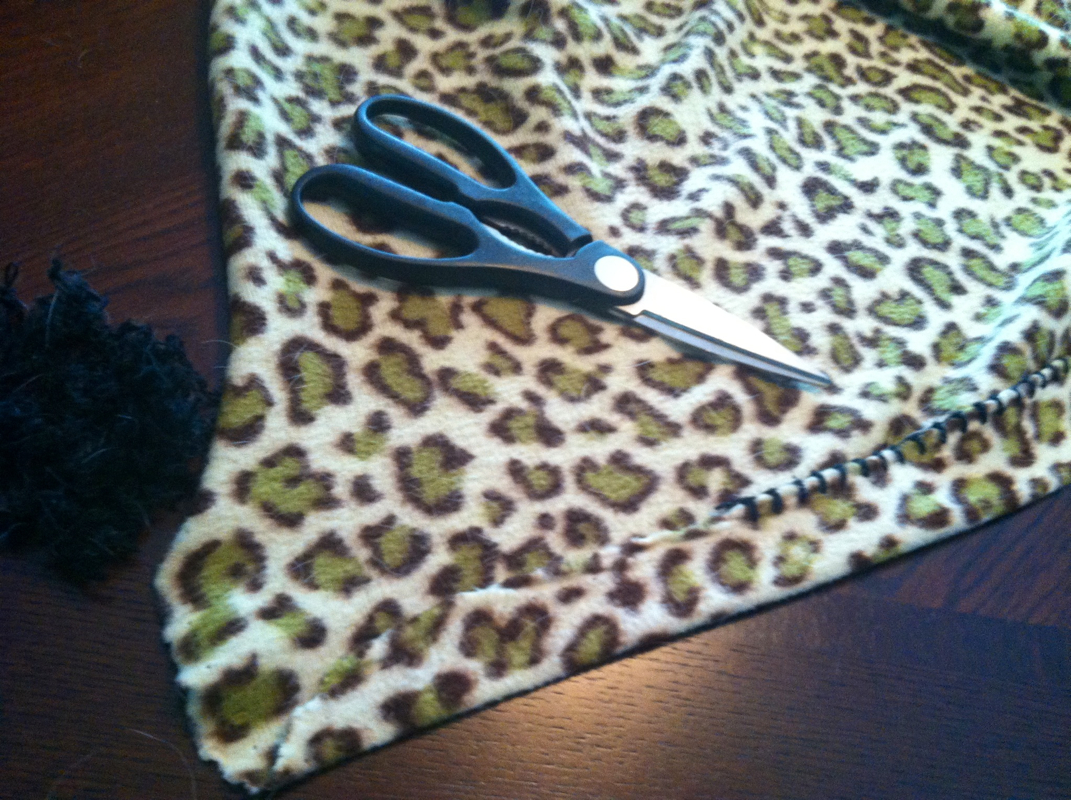
My son has an attacment to a cheap leopard print fleece blanket that I bought on a whim at the drugstore for $4 because it matched his nursery. My husband thought it was stupid just to but a blanket for "looks". Well, it ended up being $4 well spent!
It wasn't intended to be a baby blanket, so it's rather big! So, after months of my son tripping over it, I deceided something needed to be done. My first thought was to make one if those fleece tie blankets, but I didn't really want to make it any thicker since it's almost summer! So here's what I ended up doing:
First, I cut the the blanket in half. I did the same thing to each half of the blanket so that we will always have a spare!
Then, I cut the yarn edging around the whole blanket and threw it out. Now I just have a piece of fleece. So you could folloe these next steps with any fleece you buy at a craft store.
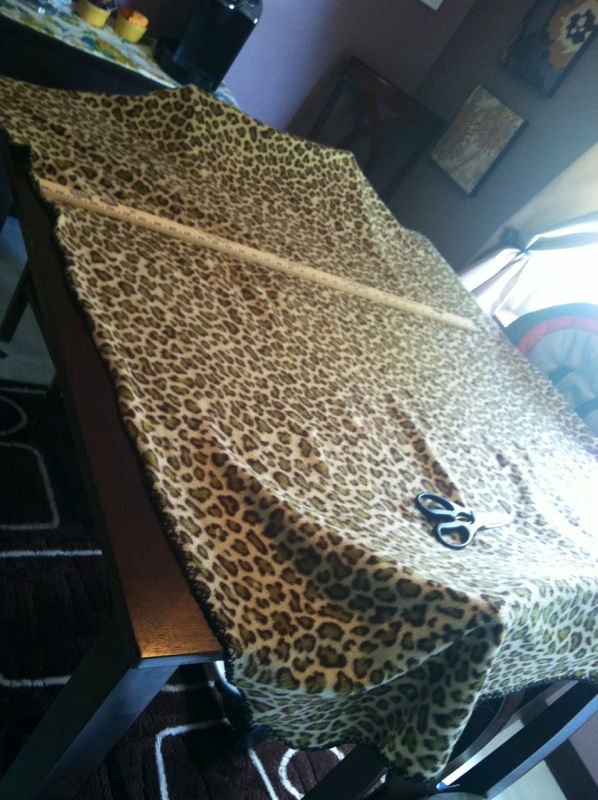
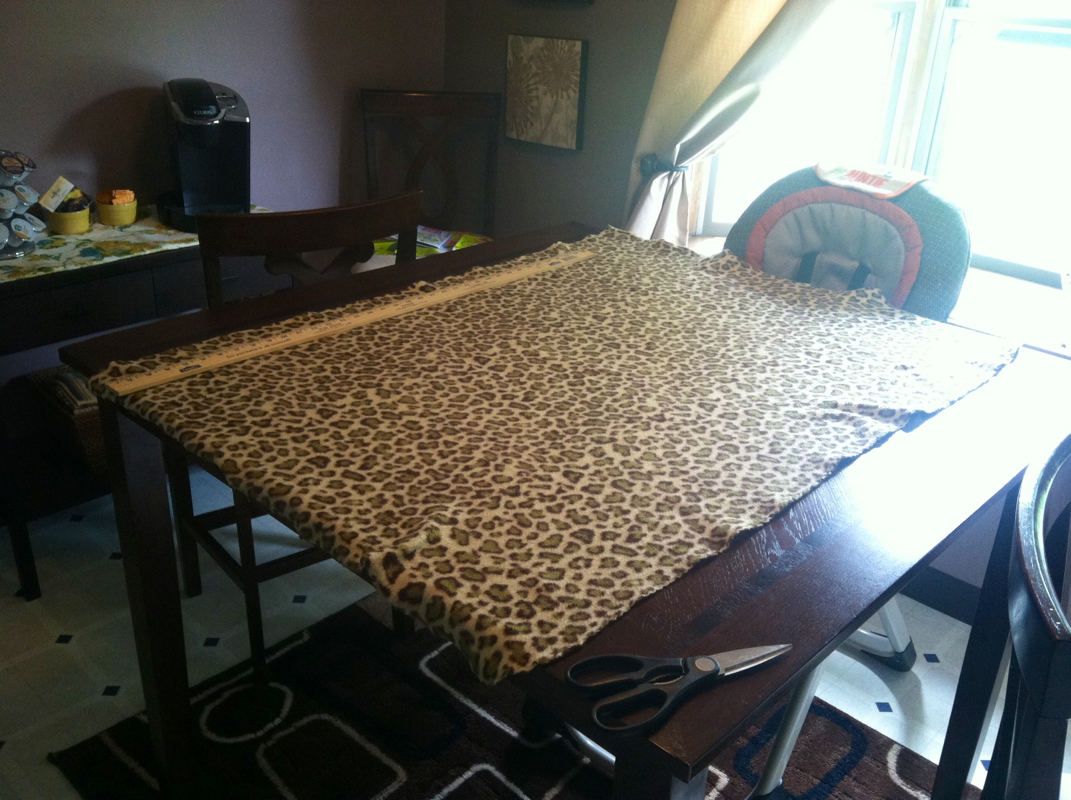
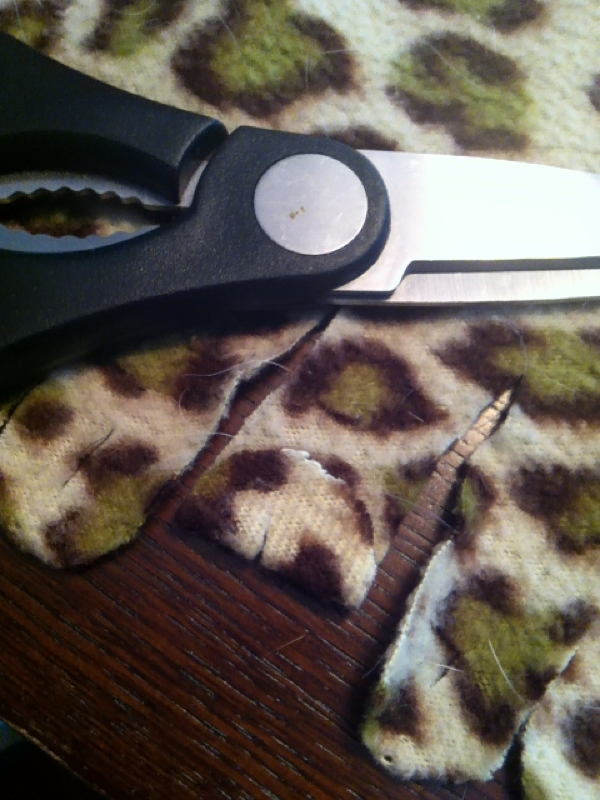
Cut 2" squares from all four corners of the blanket.
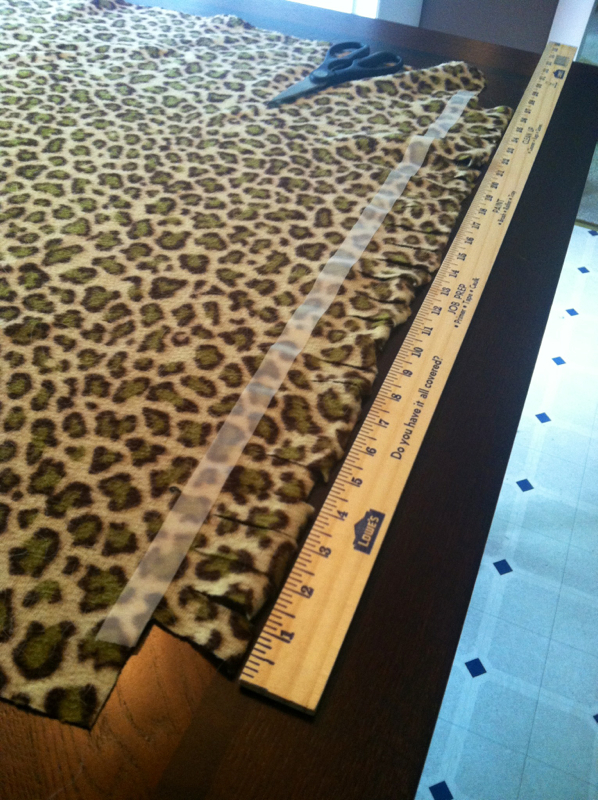
Next, cut strips 1" wide and 2" deep. I used tape to mark 2" and it made it much easier!
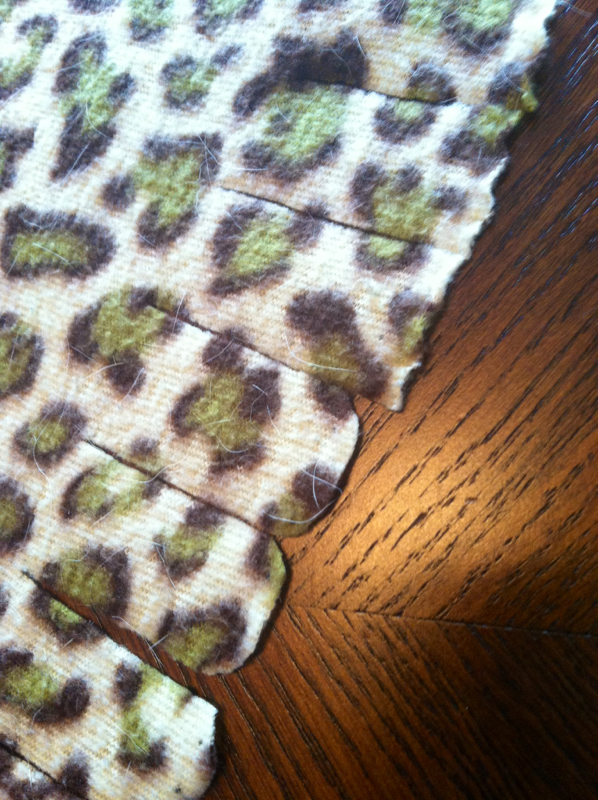
After cutting the strips all around the blanket, I went back and rounded them. This is totally your preference. I thought it looked cleaner with a rounded edge. However, rounding the edges is time consuming!
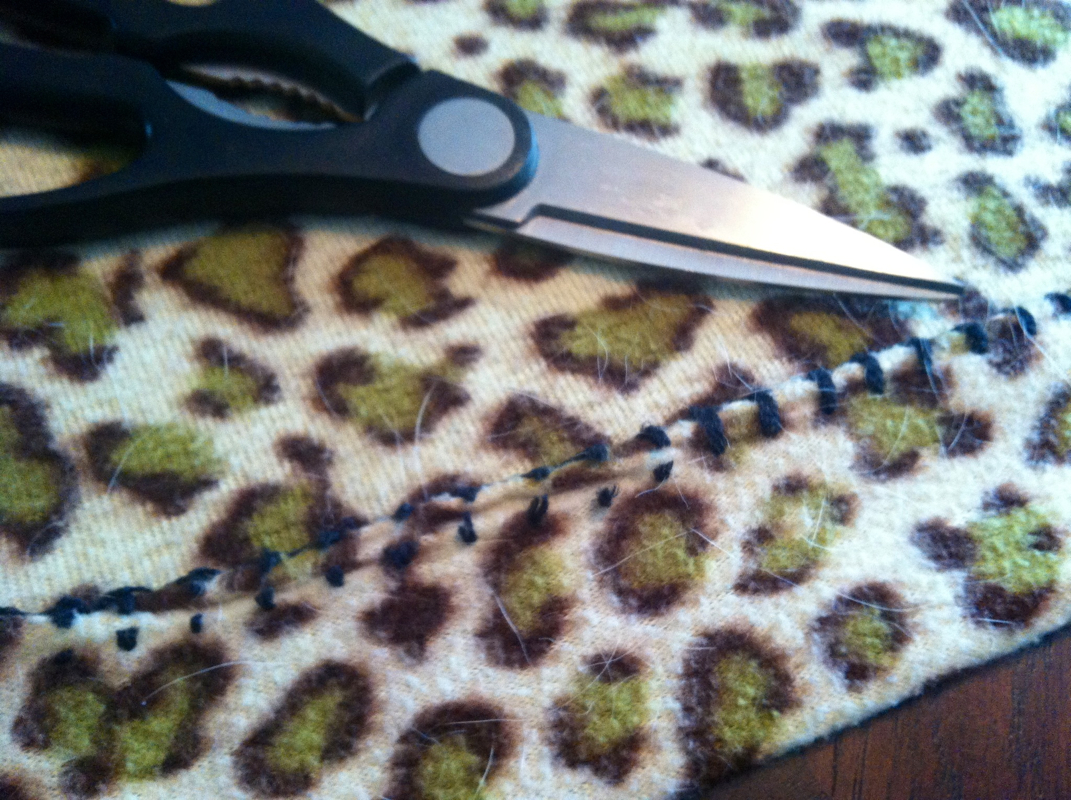
Finally! I cut little slits on the bottom of each strip by slightly folding the bottom of the strip up and cutting a slit.
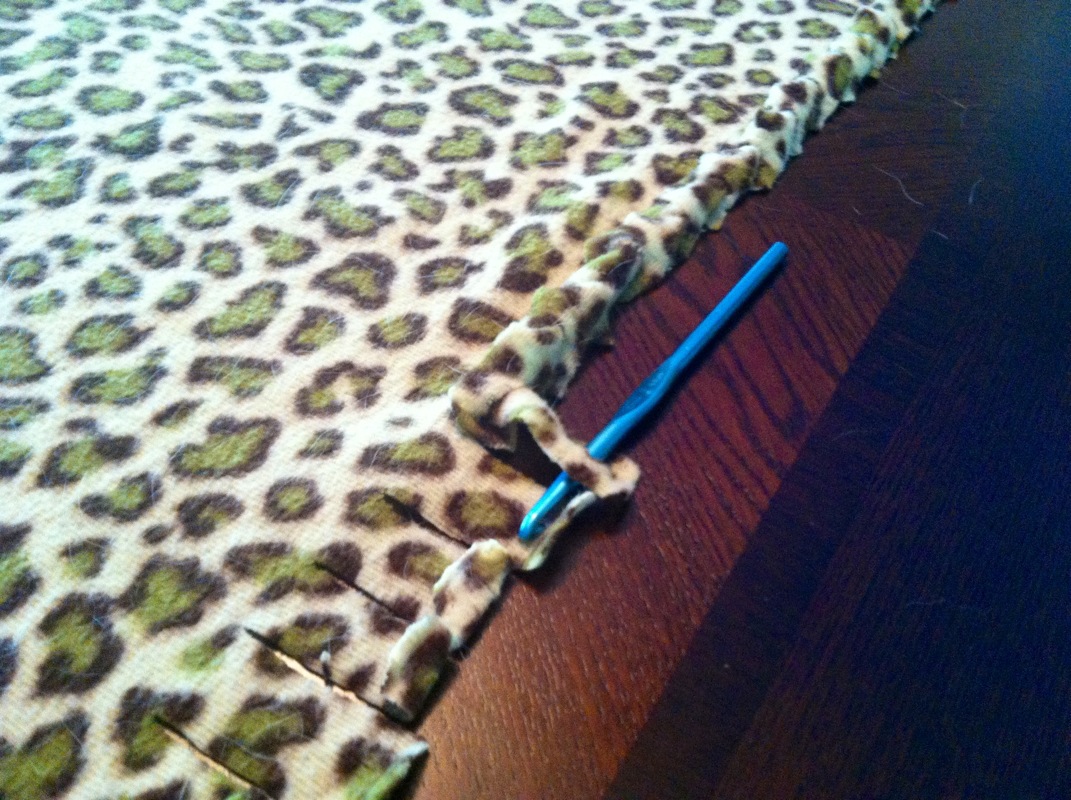
After you have cut slits all the way around the blanket it's time to crochet! I used a size H hook, but it doesn't really matter. So pick anywhere to start (just remember wherever you start is where you will end and have to tie off) and put your hook through the slit and then through the next slit and pull the second strip through the first slit. Continue this all the way around until you get back to where you started and tie off!
There you have it! A single layer fleece blanket!
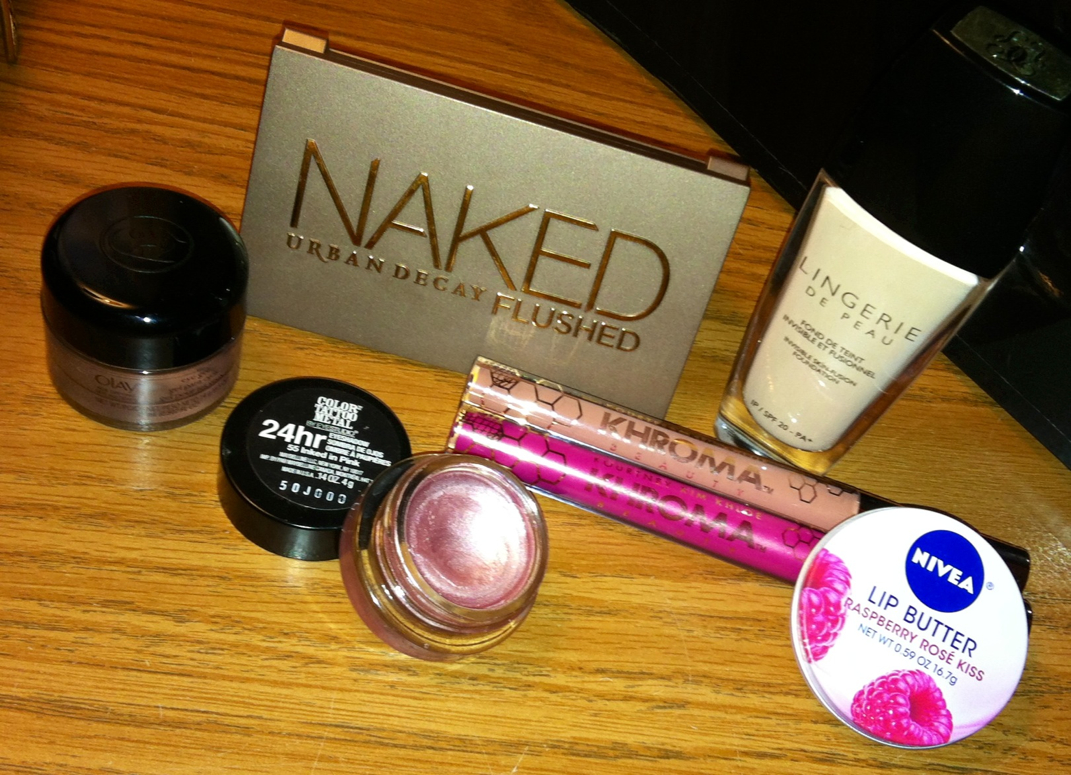
I think I'm going to start posting at the end of each month about my favorites during that month!
With that being said, here are some of my must haves from April:
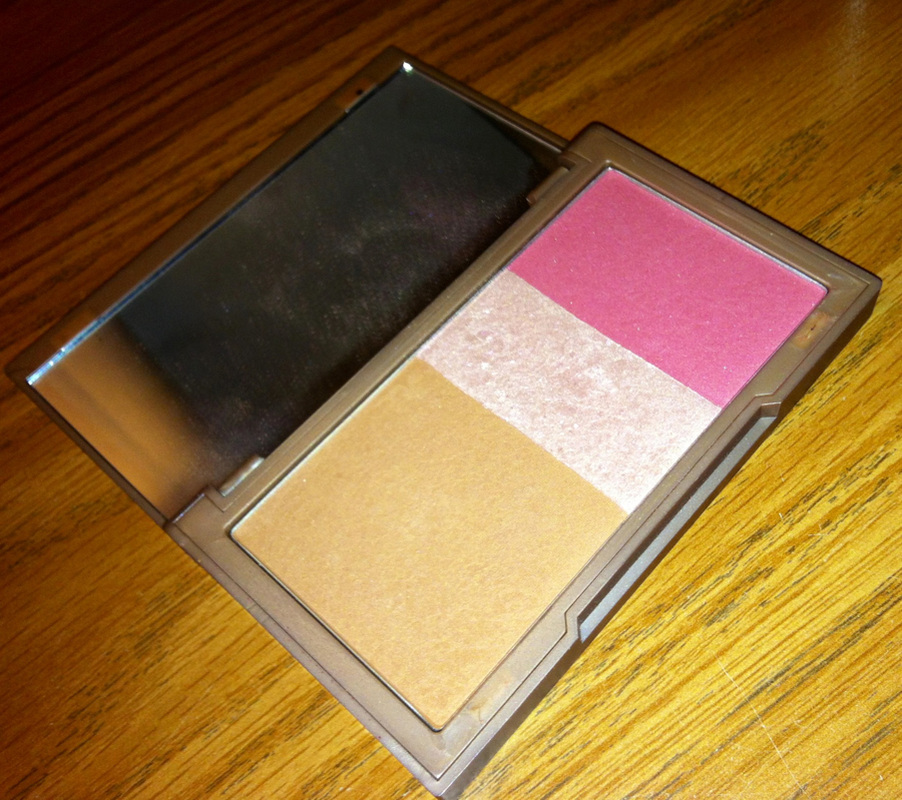
Urban Decay Naked Flushed Palette!
This cheek palette is great! I especially love it for travel. There is a matte bronzer, a matte blush and a pink shimmery highlight. A little goes a long way with this! It's a great value too! $30 for a bronzer, blush and highlight! Yes, please!
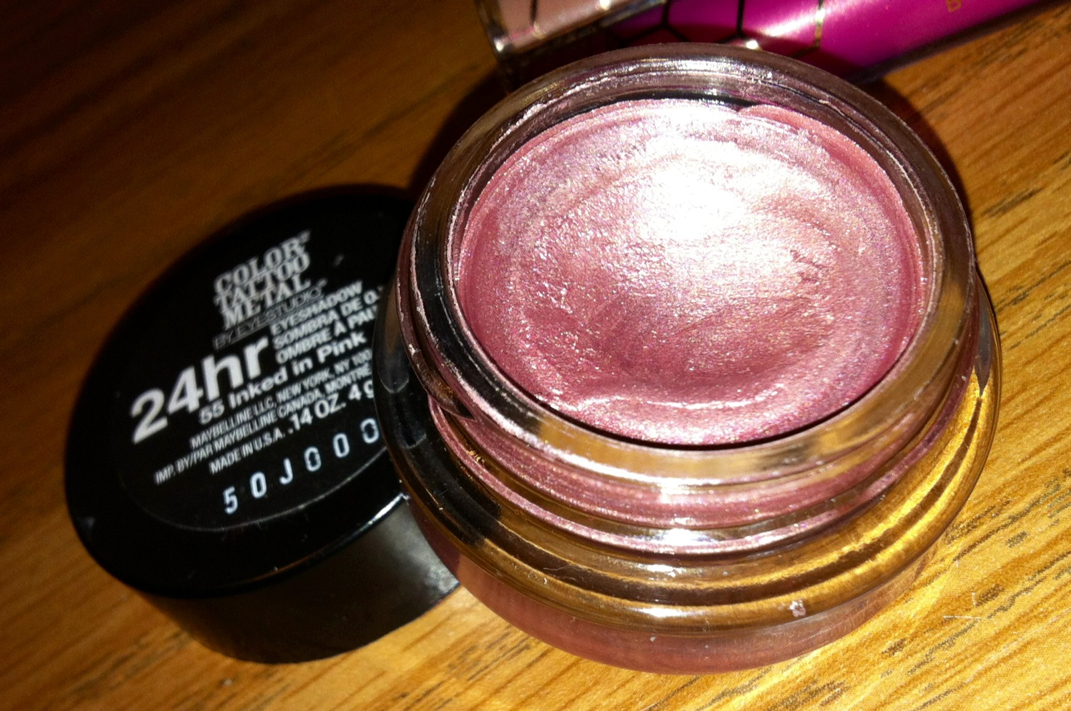
Maybelline Color Tattoo in Inked in Pink!
I LOVE this shade. I've been using it every single day. It's a great cream shadow on its own, but is even better as a base underneath shadow. I've been using it with my Naked palette under Half Baked, Sin and Toasted. Gorgeous! And it will only set you back $7!
Olay Age Defying Eye Gel!
I picked this up after I had Lasik. The skin around my eyes was tight and dry and nothing seemed to work until I got this on a whim at the drugstore. I believe I payed around $15. Which I don't think is bad, it's going to last forever! Since the very first application I noticed my undereyes were well hydrated and smooth. I used to have problems with the concealer under my eyes creasing before I started using the Olay eye gel. I will definitley repurchase when I run out!
Khroma Honey Sticks Lip Gloss!
I have these in Natural Honey and Cherry Blossom Honey. These are my new favorite lip glosses! I can't wait to get my hands on some more. I think they look great on there own and layered over lipstick. They smell and taste like honey, so you might not like them if you are sensitive to taste or smell. I really enjoy the honey scent!
Nivea Lip Butter in Raspberry Rose Kiss!
I have two of the new lip butters, but I've been obsessd with the rasberry since I got it! I use it before bed and it's keeps my lips moisturized until the morning!
Guerlain Lingerie De Peau Invisible Skin Fusion Foundation!
This is the most expensive makeup purchase I have ever made. It's regularly price at $60 for 1 fl. oz. I picked it up from Sephora.com when I got my 15% off coupon which made me feel better. It is the best foundation I have ever tried. It doesn't look thick or cakey. It just looks like skin, but better! It doesn't take a lot to even out my skin tone. Maybe one full pump. It looks good applied with a brush, fingers or a beauty blender. There is no wrong way to apply! I will repurchase but I will wait for another coupon!
What are some of your favorites from the past month?
Taken 10 days after application.
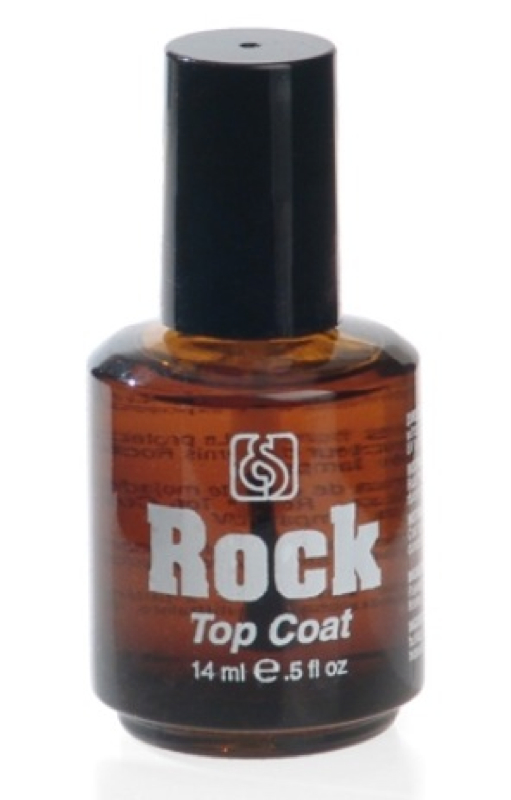
I've been trying out a new technique for applying my nail polish and I must say that it is fantastic!
The best part is that you don't have to pay to get gel nails in a salon, you just need to make a quick trip to Sally Beauty!
Here's what you will need:
- Gelous Advanced Nail Gel Coat ($5 at Sally)
- The Rock Top Coat ($8 at Sally)
- Any polish of your choice. I'm wearing OPI My Chiuaua Bites.
How to do it:
1. Prep your nails! Take off any old nail poish, file and shape your nails, push your cuticles back and gently buff each nail.
2. Clean the surface of the nail! This is very important! This step gets rid of any debris or oil on the nail plate. I use Acetone Nail polish remover (the pink bottle at Sally) or apple cider vinegar. I don't think either is better then the other, so use whatever you have on hand. I do this with a paper towel. A cotton ball will leave little fibers that you won't see until you start to apply your polish. Let it dry.
3. Apply 2 coats of the Gelous! Make sure to seal the free edge (tip of the nail) Allow 3 minutes between each coat to let dry.
4. Apply 1 coat of color and let dry for 5 minutes. Make sure to seal in the free edge!
5. Apply another coat of Gelous and let dry for 3 minutes.
6. Apply 1 more coat of your color and let dry for another 5 minutes.
7. Finally! Apply your top coat. Then go outside and relax! This top coat gets harder with UV exposure, so a few minutes in the sun will help your gel manicure to last even longer.
Be sure to leave plenty of time to dry. This technique is time consuming but worth it!
Let me know if you try it and how it works out for you!
Please excuse the poor quality of the photos. I'm on vacation and blogging from my IPhone!
Oh man! I've been super busy latley! I'm leaving for Florida on Wednesday with my son and I had to make sure everything is all set around the house for my husband. He has a bad habit of not remembering where anything is! I think thats normal though! (Haha!)
I was thinking today about the makeup I use from the drugstore. Which gave me the idea for this post! When I was in high school I never even thought about making a trip to the department store for anything let alone makeup! I exclusivley used only items that could be found at Wal-Mart. I used to be so proud of the fact that I could look good with low end cosmetics. I still believe that, but I really love my trips to Sephora or Ulta. So I thought I would share what products I enjoy from each brand that you can find at the drugstore, Wal-Mart or Target. So here goes!
Revlon: My favorite! Amazing lip products, foundation, concealer, powder and nail polish! The Nearly Naked foundation and powder, Photo Ready concealer, and lip butters are some of my go to items!
Maybelline: Baby Lips! Gotta have it! I'm not a big Maybelline fan but I will always repurchase my Baby Lips! Peach Kiss and Coral Crush are my favorites. I believe Coral Crush is limited edition but I it is still being sold.
Covergirl: Mascara! Lashblast is my all-time favorite mascara. I like the one in the orange tube, but also Clump Crusher in the green tube is great!
Loreal: Foundation, powder and lipsticks! True Match foundation and powder, Truematch Lumi Foundation are great for every skintone and undertone. I always have Fairest Nude lipstick within my reach!
Wet & Wild: Eyeshadow! Love their singles, trios and palettes!
Physicans Formula: Gel eyeliner! I have the trio for hazel eyes!
N.Y.C: Bronzer! The shade "Sunny" is a great matte bronzer, perfect for contouring!
Hard Candy: Concealer! Glamoflauge concealer is amazing. You can hide anything! You can get Hard Candy at Wal-Mart.
E.L.F: Brushes! The Studio ($3) brushes are great! These are the black handled ones. You can buy ELF at Target.
Rimmel: Primer and eyeliner! Fix and Perfect Pro and Scandel Eyes Waterproof Kohl eyeliner. The nude shade is great for lining the lower waterline to make you look more awake.
Milani: Blush! Mai Tai is my favorite shade! I can only find Milani at CVS.
Garnier: I know they aren't really a "makeup brand" but the oil-free BB cream is my favorite!
I do like other items by these brands, but these are my must haves from each! I hope you enjoyed my drugstore favorites! What are your must haves?
Spring has been here for a few weeks now, but it is just starting to feel like springtime here! Everyone breaks out their pastels in the spring and I am no different! I am obsessed with pastel nail polish! It is just so darn pretty!
I am a licensed nail technician, but I haven't worked in a salon a a couple years. I've used most nail polish brands out there, and I do have some favorites! My #1 all-time favorite is: Sally Hansen Hard as Nails Xtreme Wear. This is the best nail polish I have ever used. The formula is always consistent. That's is the problem I have with other brands. I hate when one color applies beautifully and another from the same collection is thick and streaky. Essie is guilty of this. I always see beautiful Essie colors in the bottle and will skip over it because I don't like the formula. I got the most complaints from clients that their nails chipped the day after a manicure. More often then not, they had picked an Essie polish. I'm not picking on Essie, I know they have a very loyal following! I'm just not apart of it.
My other loves are China Glaze, OPI and Zoya. I have to say that half of my collection (52 bottles!) is China Glaze. But lately I find myself grabbing for the Sally Hansen Extreme Wear because I know it will last on my nails. Everyone is different and everyone will have different results. Base coat, top coat, proper nail prep and proper application make a huge difference!
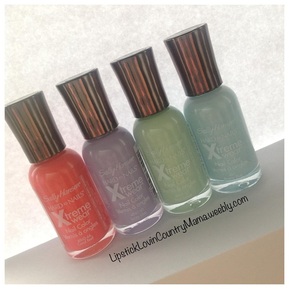
Anyways, back to these beautiful pastel polishes! The best part of the Sally Hansen brand is that they are CHEAP! Each of these bottles were only $2.50 at Wal-Mart!
The colors from left to right: Coral Reef, Lacey Lilac, Mint Sorbet, and Breezy Blue. Breezy Blue will take you 3 or 4 coats to build up to the color in the bottle, but the rest apply like a dream in 1-2 coats!
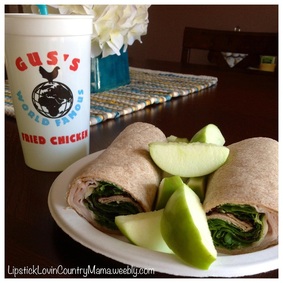
I just wanted to share my lunch with you all today! I have this at least 4 times a week for lunch. It's a whole wheat wrap with Laughing Cow swiss cheese spread, garlic hummus, over roasted turkey, and lots and lots of arugula!! YUM! Apple slices on the side and a big glass of lemon water. I have a slight addiction to lemons. About 1/4 of that cup is lemon juice! Since I'm talking about the cup I have to say that it is my favorite cup! I don't know why, but everything tastes better in this cup! I got it at a fried chicken place while we were in Tennessee!
What is your favorite thing to eat for lunch?
I need to run to the mall today and was super busy around the house this morning. I've been reorganizing the house and doing some much needed spring cleaning. So by the time I got on the treadmill and showered it didn't leave much time for makeup before my son woke up. I am not one of those people who can go out without makeup. I need AT LEAST a BB cream and blush.
I found time to post this because my son is still sleeping! I was rushing all morning just to sit and watch last nights episode of Nashville. I can't complain, it's nice to have Mommy time!
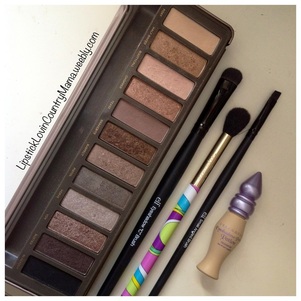
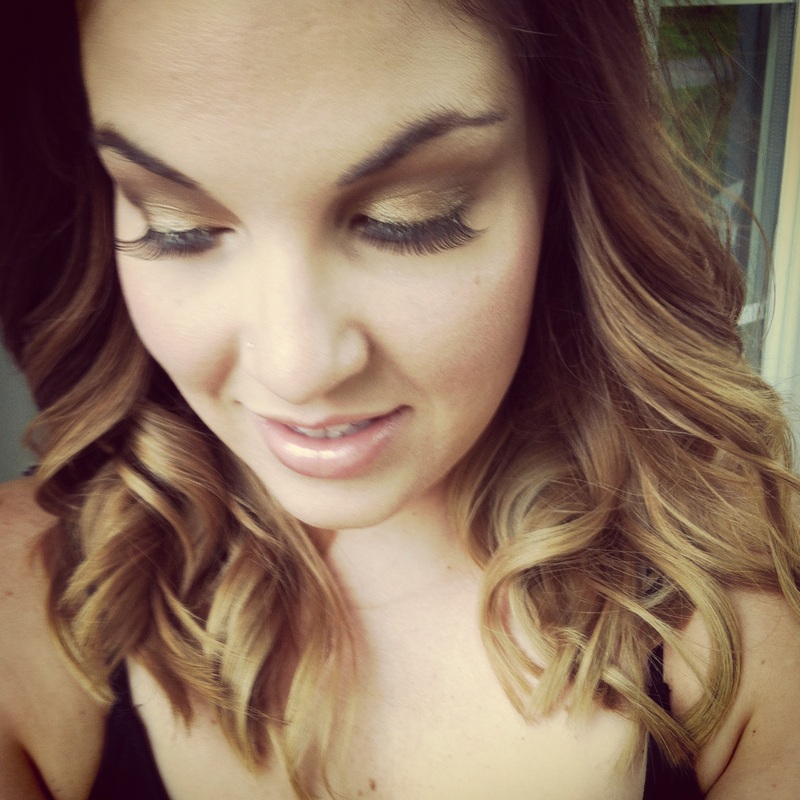
Anyways, back to the makeup look! So, this is my go-to eye look when I want something quick and simple. The best part is, it looks like you spent more time then you actually did on it.
Products I used:
Urban Decay Naked 2 Palette (Foxy, Tease, Blackout and Bootycall)
Urban Decay Primer Potion in Eden
Flat shadow brush (I used ELF's)
Big fluffy blending brush (I used a Sonia Kashuk brush from a set)
Small angled brush (I used ELF's)
You can do the look with any products and brushes you already own. These are just what works best for me. I really love the look of an all matte eye. I also use the matte side of the Wet&Wild Vanity palette to do this same look and it looks just as beautiful!
What I do:
1. Apply primer all over the eyelid.
2. Use the flat eye shadow brush to put Foxy all over the lid and into the crease.
3. Use the big fluffy brush with Tease on it and work into the crease keeping most of the color on the outer corner of the eye.
4. Then I use the same fluffy brush and mix Foxy and Tease together and blend out the crease.
5. Use the same flat shadow brush and Bootycall and put this on the inner corner (tear duct) of the eye and the brow bone.
5. Use the small angled brush and wet it. I use MAC's Fix+ but water also works! Then dip it into Blackout and line your eyes! I always wing out my liner, but it's up to you!
I love this way of applying liner. I think it's great if you don't have a steady hand for liquid liner or you are a perfectionist like me, and it seems that both eyes always look different! if you make a mistake with the black eye shadow you can just blend it out!
Other products used in this look:
Rimmel Fix and Perfect Pro
Revlon Nearly Naked Foundation in Vanilla
MAC Prolongwear concealer in NW20
Revlon Colorstay Pressed Powder in Translucent
Too Faced Chocolate Soleil Bronzer in Milk Chocolate
Physician's Formula Happy Booster Blush in Natural
Wet&Wild Reserve Your Cabana Bronzer (used to highlight)
Covergirl Clump Crusher Mascara
Urban Decay Deslick Setting Spray
L'Oreal Colouer Riche Caresse Lipstick in Pink Vinyl
I hope you liked this look and give it a try! What's your go-to eye look?
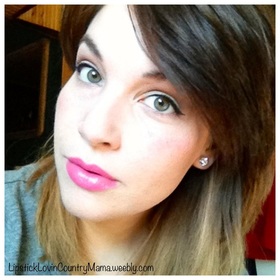
Happy April Fool's Day everyone! Ahhh April! Perfect time for a bright lip color!
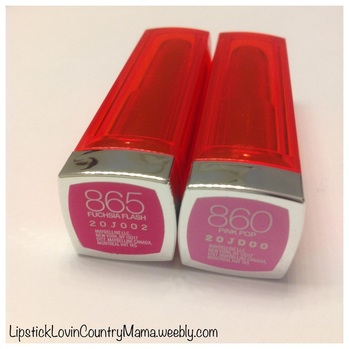
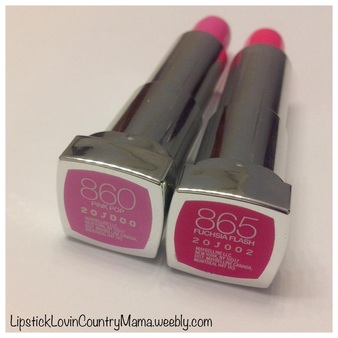
I have really been loving a couple shades for the new Maybelline Vivids collection. When I first saw these lipsticks at Target, I thought they were absolutely beautiful, but not for me. I left without them and immediately regretted it. So, next time I went (the next day) I picked up Pink Pop. It seemed like the most wearable shade in the collection. I put it on the second I got in the car and fell in love. It is a gorgeous cool-toned pink. This color looks more purple on me, but I love it! A few days later I grabbed Fuchsia Flash. This is my favorite! It is a bold hot pink. I bought this shade because it seemed very similar to MAC Candy Yum Yum. I didn't buy CYY because I really don't like the matte formula. However, I really love the formula of these lipsticks. They feel moisturizing on my lips and last a long time. I have to reapply after eating but they almost have a stain effect when it wears off. They are super bright and pigmented. If you don't think these are for you, think again! On days I want to wear a bright color but not full on neon, I use my finger to apply one of these over lip balm. BEAUTIFUL!
I love that Maybelline came out with these lipsticks. I don't often wear bold lips so I like that there is an affordable option to get in on the bold lip trend! I got these for around $5.50 each at Target. I believe there are 10 lipsticks in the collection and I am excited to pick up some more!
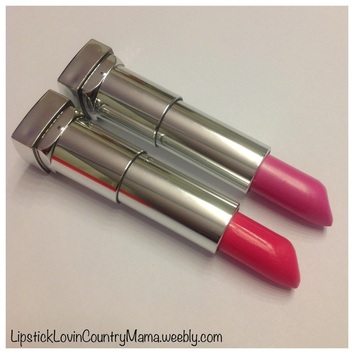
Top:Pink Pop Bottom:Fuchsia Flash
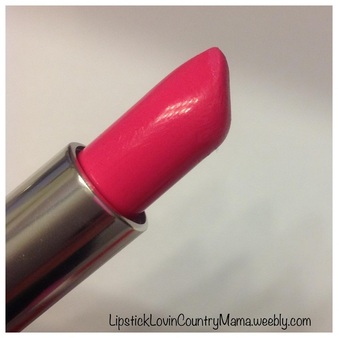
Fuchsia Flash
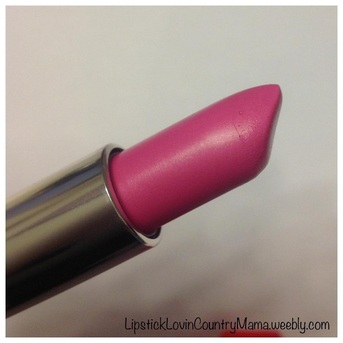
Pink Pop
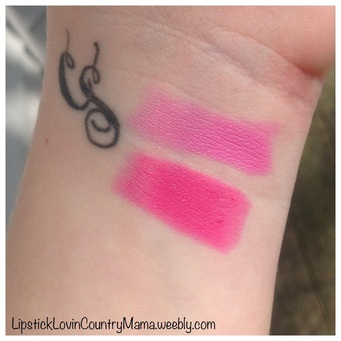
Top:Pink Pop Bottom:Fuchsia Flash
So my cousin Kate from UpNorthinJuly texted me and told me that I should start blogging! It seems less scary knowing I already have one loyal reader!
Let's start off with a little about me! My name is Sammi, I'm 24, married to a wonderful man and a mother to a handsome 16 month old boy! I love all things beauty related! Makeup being my main obsession. I am excited to blog about my tried and true products and new things I'm just trying!
Now that I'm a mom, I feel the need to be crafty (and save money!) so I am really into DIY projects! I have a rather large and growing list of summer projects!
As with any stay at home mom, I cook for my family! I'm always looking for new, easy and budget friendly receipes to try! I'm pretty easy to please when it comes to food but my husband and son are not! At least there is still hope for my son!
I am super exited about sharing my adventures in beauty and motherhood with you!
|

 RSS Feed